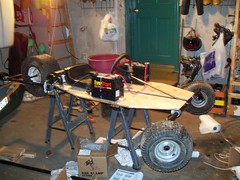
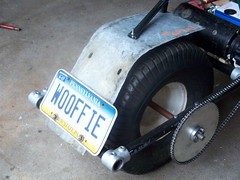
Monday, June 25, 2007

Finished product

It's taken me a while to write this, so bear that in mind.

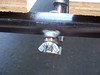
Next comes steering. With the skilled help of Gilmore & Sons Welding and Fabricating Inc., Dan Gilmore, a friend of my father's, welded the steering arm in place. It looks downright professional! The only problem is attaching it to the frame. I got two control arms with the steering shaft, so what better way to hold it in place? I ground down a tiny bit of the inside of the arm so the shaft could spin relatively freely and drilled a hole in the front pipe to mount it on. I quickly realized the problem... It wouldn't stay in place. Friction alone isn't going to keep it there, so while the steering wheel is mounted, it doesn't quite do a whole lot. However, I did get to clumsily drive around my yard in a circle about once and a half. Then the chain broke. Well, that custom screw I made broke. I have to find a different way to mount that sprocket.

The motors in R/C cars have one side flattened so you tighten the setscrew down there. I'm going to try that with this motor and my trusty Dremel. The chain is fairly loose, so when you let up on the throttle, it goes from the motor pulling the wheel (tension on top) to the wheel pulling the motor (tension on bottom) with this unsettling "chunk" noise. I think the gap between pulling and being pulled is what keeps messing up the sprocket. I need to either really tighten up the chain or fashion some kind of tensioner.
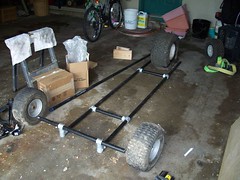
As for brakes, we've decided on a refined version of the stick of wood. We've got these motorcycle chocks that go on a trailer to hold the front wheel of some motorcycles in place. Thus, it is shaped somewhat wheel-like. I figure if I hack off the sides to make it fit around the wheel and mount it to that back bar, i can just use the springiness of the metal itself as a brake. I'd say it's a much more solid plan than the stick of wood, even if it's the same basic principle.

If you're having trouble visualizing the brakes, think of a razor scooter.

In the time it took me to post this message, I've gone and gotten that thing welded, by the same guys in fact! So now, it's drivable. It takes some effort to steer, but it works. I added a bar on the back for a passenger to hold on, which tweaks the frame a lot on turns.

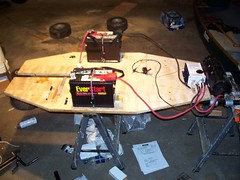
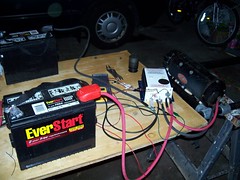
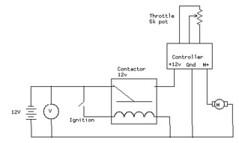
I've also fashioned a new ignition switch that's much more stable than the previous one. Looks better too.

My parents threw a graduation party for me and my friends Ryan and Henry where the GoFast was the talk of the town. Many a demonstration was granted and my sister drove it into a tree while I wasn't there (and hadn't given permission). It pulled the wire out of one of the battery clamps, broke the steering column support, mangled my new ignition switch, and popped half the front axle off. Once I had listed all the damage, I fixed it and the steering seems to be working better, which at this point, sounds better than it really is.

I aim to provide a video of the GoFast in action soon.

Wednesday, June 6, 2007

Moving

Yes, it moves. I finished the whole drivetrain thing, so now the marvelous GoFast goes fast. Unfortunately, it really does need brakes, or steering. My dad thought that the motor's friction would be enough to slow the thing down, but it isn't. So here's the deal. Please leave any and all braking suggestions in the comments! I need them.

www.flickr.com

Check the pics for more detail.

Delivered

I got the sprockets and chain via UPS today. I no longer am waiting for any parts. I've cut the keys and installed them, so the rear wheel no longer freewheels. I also stuck the little sprocket on the motor, with a bit of spacing. Not much, but enough. I have to drill holes in the rear sprocket to mount it to the hub, but after that, I break the chain to the right length, and stick it together. Then we move!

Friday, June 1, 2007

Tinkering Time

Work continues on the GoFast. Today I got the rear wheel centered and spaced appropriately. I also mounted the throttle on the steering wheel, and made a little control panel consisting of one switch and a voltmeter that will be used like a fuel gauge. I'm probably going to get a bigger switch and throw in a lil status light. Saturday and Sunday I will be away getting scuba certified, so no GoFasting there, but Monday I will get that steering shafty thing welded, and then I can mount the thing and have some control! No power yet though.

www.flickr.com

Thursday, May 31, 2007

You see me rollin'

I finally got this monster assembled enough to roll it on its own. I mounted the rear axle on, slid the tire in, and with the help of one Nick Krywolpusk, we got it on the ground. It was really an exhilarating and uplifting feeling to finally be able to sit in the thing. I couldn't steer it, nor could I drive it, but it was such a great thing, to see something that I put together finally look like a vehicle. More to come.

On a side note, my PC's power supply decided to die, so it's "better know your Mac" time for me.

Wednesday, May 30, 2007

Done... ish


Done... ish
Originally uploaded by zzm634
Now that looks like it can go somewhere. I could have probably shown this at my presentation and said, "So yeah, I finished!" Bonus points if you can pick out the things that still need to be done.

It sure doesn't look like a traditional go-kart.

Things to notice:
  • The back wheel is sitting above the frame when it will be mounted below when it's finished
  • The steering wheel isn't actually connected to or supported by anything
  • No chain or sprockets

Deadline

I gave my presentation for this project today. It didn't seem to go too well. I can assure you all that this thing is more finished than it looks. Stuff left to do:

  • Rear axle
    • Drill holes in pipe
    • Line up and mount bearings
    • Make spacers for rear wheel
    • Assemble
  • Mount seat
    • Mark holes to be drilled
    • Bolt it on
  • Steering
    • Wheel
      • Cut out sheet metal and mount custom shaft housing
      • Sand down more off wheel for throttle
    • Shaft
      • Get control arm welded
      • Mount to front axle
    • Wheels
      • Stick 'em on
  • Add pimpin' stereo system
  • Brakes?
It's mostly sliding stuff on and bolting stuff in. The hardest part will be finding somebody to weld that thing on the steering shaft. I expect to finish up everything either today or tomorrow. When my chain and sprockets arrive, I can finally get this thing moving.

Tuesday, May 29, 2007

Tenth Hour

FINALLY, my parts arrived. The crucial rear axle and steering column came via UPS today, and I couldn't be more excited. Unless I realize that I don't yet have any sprockets or chain. But besides that, I can finally make this thing at least look like it can move. I got some replacement E-clips from a (very) nearby landscaping place that happens to sell and repair lawnmowers. I had to saw off a bit more of the front pipe to give the wheels some clearance. I made some spacers out of copper pipe to fill in the gap. For the steering column to fit in, I'm either going to drill another large hole in the front pipe, or I might use one of the steering arms to keep it in place. I only need one anyway, and they gave me two, which I will need to weld onto the column.

Speaking of steering, the steering wheel I had carefully selected doesn't fit on my steering column. It seems like they should, same number of splines and all, but despite my best efforts, I couldn't get it on. So, I hacked it off. In the little bag o' tricks that came with the steering column, there is a mounting plate. So I'm going to cut apart a little sheet metal to the right shape and custom fit it on there. Shouldn't be too much trouble.

Also, the throttle I have is designed to be mounted on a scooter handlebar, so I've ground a bit of rubber off the wheel to affix it within thumb's reach.

After getting the motor hooked up properly, I'm starting to wonder if I should have included brakes on this monstrosity. I was planning on throwing the motor into reverse for brakes, but since I discovered the motor has no reverse...

Here's my idea for the simplest brake. There's a bar on the back of the kart, a rear bumper if you will. If I attach a piece of wood to it on a pivot, and rest the other end on the tire, I can slow down or stop the tire by pressing the wood against it. I'll draw up a picture.

www.flickr.com

Ninth Hour


I can't believe how much I got done today (yesterday). It all started when I realized I had other stuff to do besides wait for parts to come in. Then I kinda winged it from there.

I cleaned off that piece of wood I had been using as a table and went to it with my trusty circular saw. I cut it to size, and then realized the wheels would need more clearance in the front. I also had to leave room for one (two?) batteries on each side. The result is the most awesome octagon ever seen. I bolted that to the frame with some U brackets, leaving some spacing for the clamps. After mounting the controller to the back, I screwed some blocks and eye hooks to keep the batteries in place.

Tomorrow (today) I expect to get the seat mounted.

Really picking up momentum.

Saturday, May 26, 2007

Back in business


The motor is back in action. In fact, it's better than ever. Nothing was wrong with the motor as it turns out. The two batteries I was using were marine batteries, meaning they have short circuit protection. For those who don't know, a short circuit would be just directly connecting the two terminals. This makes sense for a marine battery that could be say, dropped in salty water. However, high-amperage applications like an electric vehicle for example could be misconstrued as a short circuit, which is why the batteries weren't delivering. I stopped down by Wal-mart and picked up two automotive batteries (2 * 12v = 24v) and lo and behold, the thing moves. And it MOVES. Much faster than I've ever seen it go.

I'm back on track. I FINALLY found some gears and sprockets that will fit my purposes. After six weeks of searching and the help of my surprisingly internet-adept father, we've got the right drivetrain on its way here, and I'm going to cut and mount that hunk of plywood onto the frame to hold my stuff down. The motor might be a problem... considering the shaft is 15/32" and the sprocket is 1/2", but I think it will be "good enough." I will most likely end up making my own little collar from copper pipe which just happens to be a little under 1/16" thick.

While I couldn't find the E-clips I needed to get the front wheels mounted and ready to roll, I did notice a nice, keyed, 3/4" shafted gasoline engine at pep boys today. Not only was it tempting, since it would fit perfectly with a wide variety of sprockets, it made the "hybrid" aspect of this project that much more attainable.

No I will not finish this project by the time I have to give a presentation on it, but I will finish it in the following weeks shortly after.

It's thundering like a BEAST outside. No rain, just thunder. I'm surprised we still have power. Peco's been good about no power outages recently. Time to play F.E.A.R. with the lights off :D

Friday, May 25, 2007

Hybrid?

Yeah, in my project proposal I had thrown out the idea of making a hybrid go-kart. It seemed like a simple task on paper, but then again the entire project did.

Turning this into a hybrid would mean finding a 24V DC generator (or other and get a converter) and connecting it directly to a small engine of sorts, like a weed whacker or other lawn tool. Right now though my primary concern is getting the motor and batteries I have working, not adding stuff to them. Since I have a feeling this won't be complete until after May 30th, when I am to present this project, I will try to add hybrid functionality over the summer. I'm more concerned right now about building a go-kart that goes than one that is good for the environment.

Wednesday, May 23, 2007

Turn for the worse...

This project is looking more and more grim. Stuff isn't coming in, I can't find ANY parts to fit what I need, and now the motor is on the fritz. Buying a new motor is out of the question and I wouldn't know how to mount it, considering the special way this one was built.

So here's the deal... I've got to give a report on this failing project in about a week. I have a strong feeling that this thing will not be finished by then.

I'm very frustrated right now. I couldn't get the motor for a while, then there was some trouble with the fittings, and electronics, which set me back about ten days, and I couldn't order the rear axle parts until I knew what size the wheels were. Then I straight up couldn't FIND a rear axle for the longest time, and since I ordered it some 8 days ago, it still hasn't shipped. And absolutely nobody has any sprockets that will fit my motor and axle.

I need a machine shop of my own. Or just be in college.

And apparently I'm supposed to write 6 more blog posts. It didn't seem hard to do when I started this project, but since I've been able to do absolutely nothing for a week, it's all gotta happen in the next six days, which it entirely ISN'T.

I should have just done something easier, more defined, like an internship. Am I prepared for the adult world? Apparently not.

Tuesday, May 22, 2007

Front steering

I gallivanted down to my grandparents' house Saturday to get the front steering set up. It seemed a simple task. I needed two holes drilled in a section of pipe. Simple, no? Well, yes it actually was pretty simple, but I could not have done it on my own. To drill a hole in metal, you have to start out small and get progressively bigger. So drilling one hole is more like five.

I got down to my grandpa's house and we went right to work. I had been in his basement a couple times before, but I never got a good look at it before. The place is downright magical. He's got at least two of everything you can imagine. We have one rubber mallet at home, and he's got six, in all different sizes. We made our way over to an old looking Black and Decker drill mounted on a vertical press to get this job done. When I asked him how he got it he told me that he worked as a mechanical engineer for some large companies. I asked, "How did it get from there to here then?" to which he responded "Well, how did that medicine get in your medicine cabinet?" My parents are both doctors, so his point was well taken. I would admit too that when stuff is no longer needed by a company, of if they can be convinced that it isn't needed, it tends to disappear rather quickly.

After much effort, we got the holes drilled. It took a bit of grinding down to get the control arms to fit, but they fit well, angled perfectly. I threw a rod on there for steering that I will connect to the steering column when it arrives... If it arrives... :/

As the deadline for this project nears, I'm becoming more and more impatient with UPS and the stores I've bought stuff from.

www.flickr.com

Thursday, May 17, 2007

All about control

I finished the wiring as much as I could without an on/off switch, which doesnt seem that important right now. However, I've been reluctant to fire the thing up, to see if the motor spins. Instead of asking "Why haven't you turned it on yet?" ask, "Did that thing come with good instructions?" "Do you know if it thinks 5k ohms means stop or full throttle?" "Do you feel like paying another $275 to get another one if you break it?" The answer to all three questions is "No." Until I get some more answers, I'm gonna lay off messing with it.

Wednesday, May 16, 2007

Coming Together

The Magical Mystical GoFast is starting to take shape. The frame is pieced together, the motor is mounted, and the speed control finally came.

Being an old starter motor, the motor had a solenoid bolted on top of it. After I removed it, it left four bolt holes just waiting to be used for something. It would be perfect for mounting something to it. I wanted to mount it on some crossbars going across the width of the frame, that way I could adjust it forward or backward to get the chain tensioned up right. See the picture below for the motor mount.

When I mounted the motor and threw some juice on it, I noticed something peculiar. The motor spins the same direction regardless of which wire is positive and which is negative. Took me a bit to figure out why, but I understand it now. Most motors use large magnets in the motor can for the armature to pull around. This motor however, uses wire coils to generate that electric field, so when you reverse the polarity, you also reverse the magnetic field, thus canceling the two changes out. You can tell in one picture, the motor is mounted one way, and in the next, I've switched it around.

As for the controller, I got around to cutting and crimping the wire to the right lengths and got it all wired up. I had to make some special clampy things to fit on the batteries due to their non-standard standoffs. I had to stop my wiring work when I realized I don't actually have an on/off switch. I'm hoping to find one of those really big ones shaped like a tuning fork mounted on a hinge. Think "Throw the switch Igor!" It's got to be able to deliver up to 250 amps, but not at contact. If anyone has an old electric chair sitting in their basement, shoot me an email. :P

www.flickr.com

Wednesday, May 9, 2007

Ready for some... Progress?

My clamps arrived Monday, and most of the electronics arrived today. I say most because my package was missing one product... the $275 speed controller. Now I'm not saying it's foul play, but the most expensive item in the group goes missing?

Well anyway. I started work on the frame, which is pretty simple. After seeing the clamps, I'm actually pretty confident in their ability to keep the pipe in place. If not... the clamps are steel, the pipe is steel, and my original plan was to weld it anyway.

Here's a picture of the nearly finished frame. It still needs brackets to hold on the rear axle, and holes drilled in the front for steering. Note: That bar in front is just to line stuff up. The finished product will have a larger wheelbase. The entire frame is also upside-down.

Frame

Update: The controller ships from the manufacturer, not EVUsa, the retailer I got it from. No worries.

Thursday, May 3, 2007

Taking it slow

Yeah, I haven't updated in a while... What with this fittings situation and ordering the electronics, I've basically entered shipping limbo, as I wait for my stuff to arrive. I've kinda hit a roadblock. I need to figure out how I'm going to transfer the power from the motor to the wheel now. The wheel has a keyed groove in it, which shouldn't be a problem, but the motor shaft doesn't. A sprocket with a setscrew probably wouldn't be strong enough, so I'll either have to take it some place to mill a groove in it, or somehow figure out a way to use the hole drilled in the end to my advantage. The hole was used to keep a starter gear thing from coming off the shaft. My other option is to see if I can use that starter gear thing... it's a bit hard to explain exactly what it is. Anyway, When I finally get the stuff in, it will be nice to make some progress again.

Wednesday, April 25, 2007

Another small problem... Resolved!

Well, I was cutting the pipe for my frame today when I realized something. This picture pretty much sums it up.


My father keeps telling me, "No project goes without problems." Time to start listening. My two contingency plans involve either the Simplified Building Concepts guys to cancel my order, which I've already called them about it, so that I may order the right size clamps, or, buy a different sized pipe and cut the pieces again.

Speaking of cutting the pieces.

Chop saw with metal-cutting blade? No.
Hand powered hack saw? No.
SUPER SAWZALL?! YEAH BABY!

Update: We talked with the guy over at Simplified Building about it and he claims the clamps will fit any pipe below 1.32 inches. My pipe's outer diameter is 1 and 5/16 inches, or 1.3125, so it should be fine.

Monday, April 23, 2007

Framework


Framework
Originally uploaded by zzm634.
For those of you that have been wondering what this thing is gonna look like, I've laid out the frame here in my garage. I have one concern, and that is that the weight of the batteries could be too much for the piece of plywood i'm going to use as a base. If it is a problem, it shouldn't be too problematic. I've measured it out and I'm going to calculate the parts I'm going to need tonight so I can order them online or pick them up tomorrow in store somewhere.

Saturday, April 21, 2007

One man's trash...

Another day of progress it seems. Rocky told us of a place "where lawn mowers come to die." Convenient. I was in the mood for some tires and a steering mechanism, and that's just what I got. I returned with a bunch of tires of varying sizes (the big one goes in the back), some steering... axle thingies, a throttle that could work if it's the right kind, two seats, and most importantly, the steering wheel. The guys let us have the stuff for free, so in return, we bought them some pizza.

Eat up some photos:

www.flickr.com

I really like this whole junkyard deal. I think I shall be doing it more often.

Friday, April 20, 2007

Trial Schematic


schematic
Originally uploaded by zzm634.
I've cooked up a schematic for my wiring. For the ignition switch, I'm not exactly sure if the contactor circuit would work. It draws its power from the battery to complete the circuit, but I wonder if when the battery runs down, will the contactor disconnect? If so, this could be a cool low-voltage shutdown switch. If not, then I will have to use a seperate 12v standby battery. Also, the contactor relies on a magnetic coil; it's basically a solenoid in a box. If the voltage drops slowly, the contactor would disengage slowly, which could cause problems with arcing.

Any suggestions?

Now it's official

Today was officially my last day of classes. I still have some APs to finish, and some reflections to get in, but I look forward to having the time to really get into this project.

Crisis Avoided!

zm634: crisis avoided!
mrb4rkz0r: what crisis
zm634: with my motor
zm634: do you know how an electric motor works?
mrb4rkz0r: no
zm634: care for an explanation?
zm634: it will help my story
mrb4rkz0r: sure
zm634: well, you got this thing in the middle called the armature
zm634: it's basically a cylinder of steel, iron... some magentic material
zm634: magentic
zm634: anyway
zm634: it's cut into sections
mrb4rkz0r: ok
zm634: equal sections
zm634: angularly
zm634: then wire is wrapped around said sections, so that when current goes through them, a magnetic field is created
zm634: then you got magnets (or more coils) around the armature
zm634: and the coils in the armature go up to this thing called a commutator
zm634: the commutator is a very smooth smaller cylinder that is also sectioned off to the same number of sections the armature has
zm634: this is where the coils of wire go
zm634: to get power to these wires, metal blocks called brushes rub against the commutator
zm634: and the way they are angled and sectioned off creates magnetic fields in such a way that the thing rotates
mrb4rkz0r: ah
zm634: i wont get into magnetics, but you get the idea
zm634: anyway, these brushes here are on springs, pressed against the commutator, because they wear down over time
zm634: this motor here though, is really.... REALLY heavy
zm634: so i thought i'd try and remove the whole starter solenoid part
zm634: which weighed a ton
zm634: so i unbolt it, and go to pull it off
zm634: and the armature kinda slides forward a bit and i hear this "chlick, chlick"
zm634: and ima like... crap
zm634: the commutator had slid forward and all the brushes had slid in behind it
mrb4rkz0r: mmhmm
zm634: like, imagine two people pushing two blocks perpendicularly against something in the middle
zm634: then pull that thing out and try and get it back in
mrb4rkz0r: ooh
mrb4rkz0r: bad
zm634: so now... normal motors have 3 sides to the armature and two brushes, one on each side
zm634: so i know i have to pull the brushes apart to slide the thing back in
zm634: and i see these two big holes on the side with a fancy cover thing... right about where the brushes would be
zm634: i unscrew one and, success! i find a brush!
mrb4rkz0r: lo!
zm634: on the other side too! happy day, this will be easy
zm634: i got lucas and maddie to get needle nose pliers and pull the brushes out while i slide the armature in
zm634: remember, brushes on springs
zm634: i try pushing it in... no dice
zm634: lucas tries... still no dice
zm634: i gramble, come up here and read some digg, while trying to figure out how to get this thing back on
zm634: i decide i've gotta take the back plate off that has the brushes in it, and stick the armature in it while they're pulled back
zm634: i get all the screws off, and what do I see?
zm634: EIGHT brushes
mrb4rkz0r: haha
zm634: now if i were some hindu god, this would be easy
zm634: unfortunately, i'm not
zm634: and all these damn things are on springs
zm634: STRONG springs
mrb4rkz0r: so what did you do?
zm634: well... first failed attempt, i tried to wedge the springs open with long nails long enough to slide the thing in,
zm634: then take the nails out and it clamps down
zm634: that didnt work at all
zm634: then i came here and watched those GI joe psas
zm634: then i asked, myself... why not just take the brushes out?
zm634: GENIUS!
zm634: i pulled back the springs... slid the brushes out
mrb4rkz0r: ah ha!
zm634: stuffed the armature in the bearing on the end, pulled the springs back... stick brushes back in!
mrb4rkz0r: yay!
zm634: and that's what i've been doing since I got home [4pm to 9pm]
zm634: :/
zm634: I did get the starter assembly off though
zm634: and tomorrow I get to use my special metal saw blade
zm634: metal-cutting
zm634: saw blade
mrb4rkz0r: cool
zm634: it appears to be just like... sand or something
zm634: but anyway
zm634: my fingers are still black from the grease...
zm634: and i still smell like a steam engine operator
mrb4rkz0r: haha
zm634: it's quite a distinct smell
zm634: i should have just used a steam engine
zm634: it would have looked so cool
mrb4rkz0r: haha

Unfortunately I didn't have the mind to snap some pictures of the MASSIVE armature inside the motor before I got it all together, but it's unlike any I've ever seen. I did manage to get the solenoid garbage off though. Here are some more pics:

www.flickr.com

What I've learned from this? Keep a calm head and don't rush things, or you WILL make a mistake. Also, if something's really hard, you're probably doing it wrong.

Motor and Battery

I got the motor I'm going to use yesterday and I decided to snap a few photos to show you all how big this thing is.

www.flickr.com
Getting this motor was an interesting task, one that has probably changed the way I view life itself. Sounds kinda corny, but it could be true. I had been looking around online for a motor powerful enough to get the job done, and I had only come up with ones in the $500 variety. I then began to consider the scrap yard option, as in, scrounging around for one. I've been watching as much Junkyard wars episodes as I could get my hands on, and I had this glorious picture of mountains of junked vehicles and parts everywhere, being able to run free and look for what I wanted to my hearts desire. I proposed the idea to my father and he said he knows of three junkyards in Morrisville we could check out. Excitement grew.

However, while I was still looking online and planning stuff out, my father had called around and asked if they had anything I could use. I was surprised he did this, and a bit unhappy that I had not done it myself. He told me about this man, "Rocky" who had found a large starter motor that changed its purpose from boat engine, to large truck engine, to airplane turbine engine multiple times before we got it. It seemed every time my father called him to ask if he had it yet, something had come up. After two weeks of calling, he finally got it one day while I was in school. My dad sent me a text message stating "gon pick up motor after work." I became more excited still.

Now though comes the reality. We drove out to what I thought was a scrap heaven, which turned out to be a auto body shop that seemed to be just in some neighborhood. My idea of "Rocky" was also a bit off from the truth. I imagined a perhaps partially crazy guy hoarding over a pile o' junk and saying "whatever, anything's $2!" Instead I got what appeared to be a regular guy!

We spoke with him a bit about my project, and how he couldn't get it to us sooner because his basement had flooded, and then he took me out front to the trunk of a old Cadillac. Inside was not exactly what I would call a motor "worth a thousand dollars new." It was black and somewhat rusty, with a metal-stamped label riveted to the side that said Delco-Remy in less than modern font (see the picture above). He was glad to show me the ins and outs of how the thing worked, what the solenoid did, and he hooked an emergency battery up to it to show me how well it still worked. He seemed to enjoy talking about it, even though I kinda knew what everything was, I let him tell me anyway.

After lugging the 80-pound behemoth to the back of the van, we talked some more. He refused any kind of payment for it, I guess content that he was helping out a student with his project. We talked about his job, how he's still doing it after 43 years. He's got six kids, all of which at one time worked at the auto body shop (if that's what it can be called) and 14 grandchildren. My dad said he was the perfect example of a hard-working American. He's always worked hard and had little more than a house in Levittown, and he's perfectly content with that.

He gave me some good ideas, some sage advice, and then sent us on our way. Talking to him has certainly changed the way I look at society now. I was surprised that he not only went through two weeks of calling around and searching to find this thing for me, but he did it without any reward. Quite a different approach than this cut-throat, buy or be bought world I'm told I'm in. Hopefully I'll meet more people like Rocky, friendly and eager to help.

Welcome

Hey all, I've finally started this blog, because I finally decided on a name for my project.

The GoFast, hurrah for 90's web capitalization.

This is my senior project at Princeton Day School. I somehow got them to let me build an electric go-kart, something I would have loved to do anyway. I'll be posting frequently, keeping you up to date on the problems I encounter, the solutions I find, and the experiences I experience.

I give my thanks to Sir Marcus of Neurotikart for his help and inspiration.

Keep posted